![]() Welcome to the Vertical Photo Placer plugin user guide!
Welcome to the Vertical Photo Placer plugin user guide!
The Vertical Photo Placer (VPP) is a free open source plugin for QGIS that performs quick placement of vertical drone photos on map.
The objective of VPP is to provide a tool for quickly geo-referencing and visualization of vertical drone photos on map. Geo-reference is done by generating a world file for each photo according to ESRI specification, see World file for detailed information.
This plugin should be used in cases when quick information visualization is needed such as disaster response. If geo-referencing accuracy is top priority, other tools should be considered.
Installation
Prerequisites
The VPP is developed with Python 3 and available for QGIS version 3.x. This plugin requires the installation of GDAL, NumPy, ExifTool. GDAL and NumPy are normally included in QGIS already. ExifTool is an external library for reading and writing metadata in photos. VPP uses ExifTool to access drone photo’s metadata tags.
First, install QGIS 3.x if it is not installed yet. Please download and install following this guide.
To install ExifTool, download from the official website the suitable version to your machine (Windows or Linux/MacOS). Note that the Linux version can be used in both Linux and MacOS machines. The downloaded file is a compressed .zip file on Windows, or .tar.gz in Linux/MacOS. Then, extract the file to a folder of your choice (see Figure 1).
Note: In Windows version, the executable name may be: exiftool(-k).exe. This may not work. Please make sure to rename it to: exiftool.exe
In addition, a “.ExifTool_config” file is required. This file can be downloaded from the VPP’s tool folder. Please download and insert it to your ExifTool folder (see Figure 1).
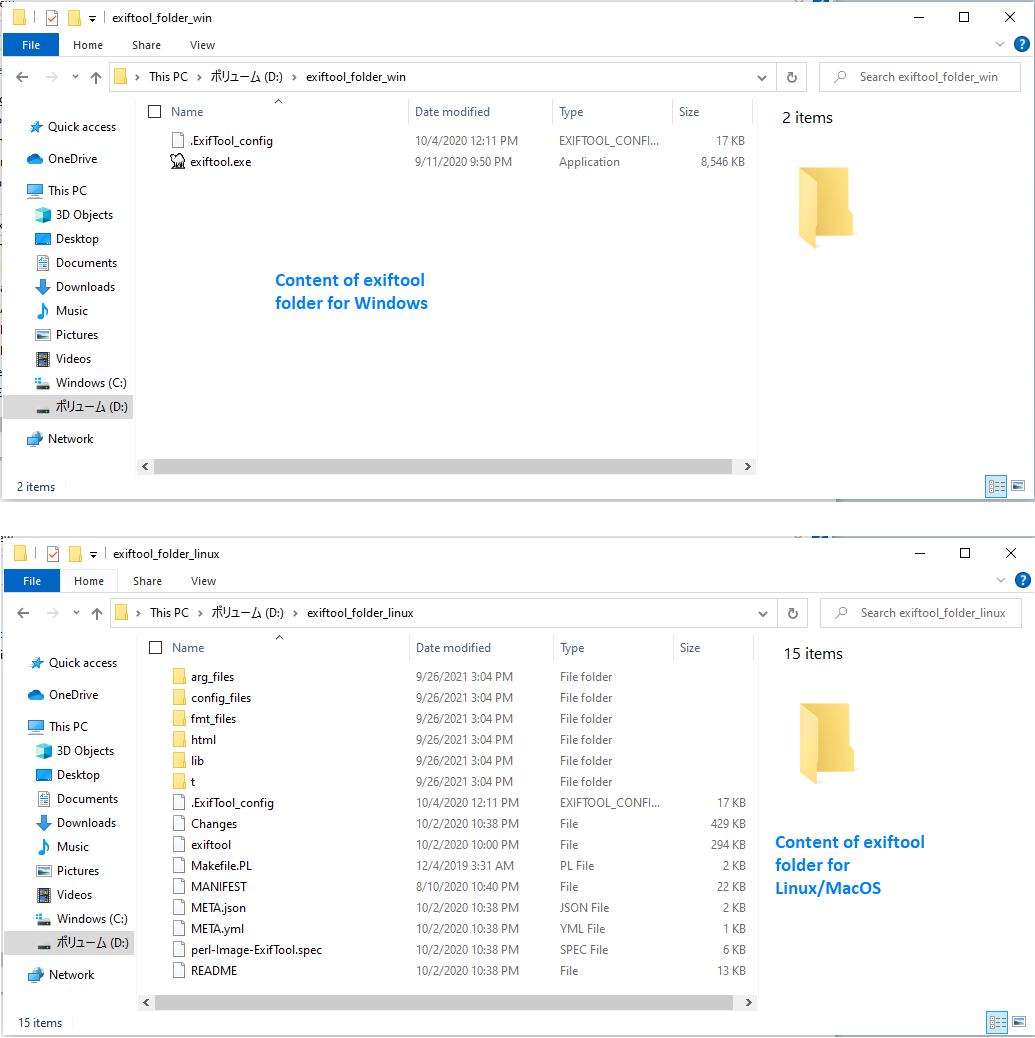
Figure 1. Folder structure of ExifTool in Windows (above) and Linux/MacOS (below)
Finally, this folder needs to be added to the QGIS’s PATH environment variable. Please follow these steps in Figure 2.
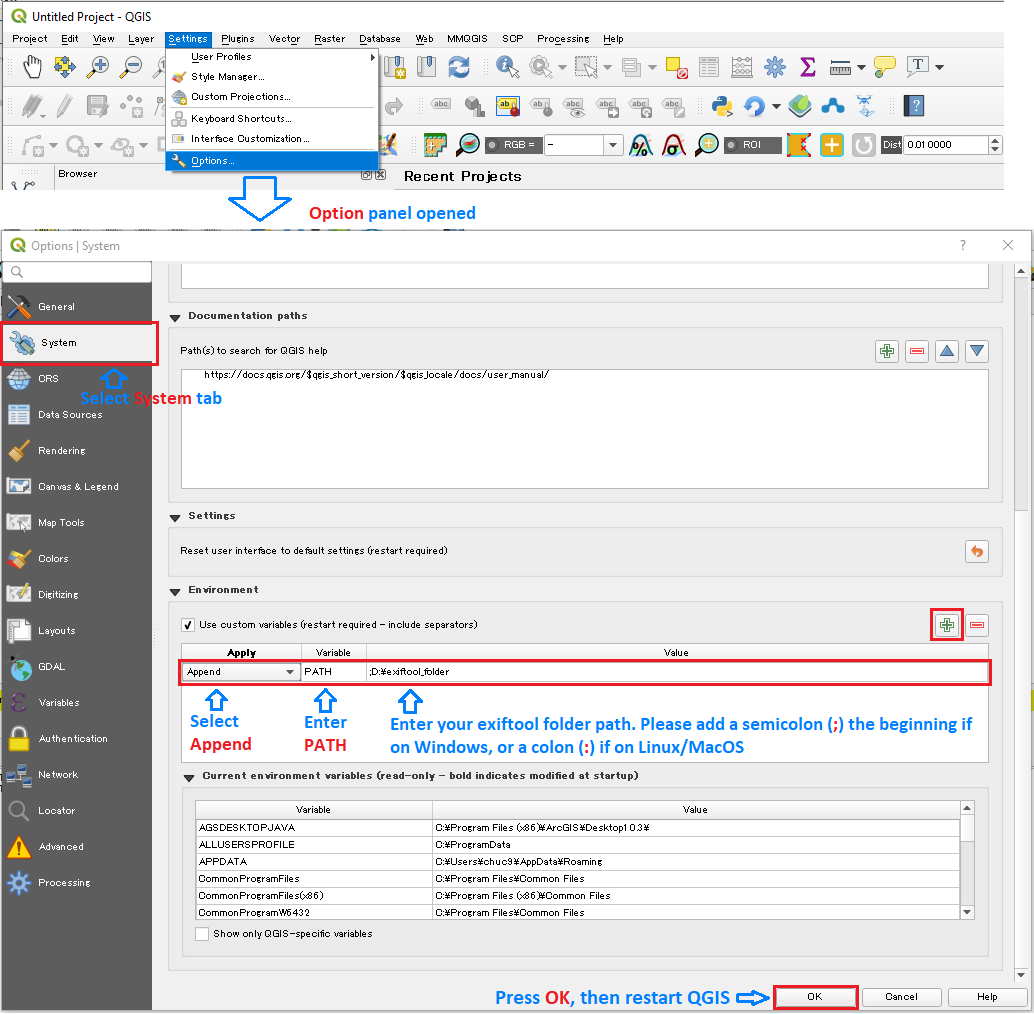
Figure 2. Add ExifTool folder to QGIS's PATH environment variable
Please restart QGIS to apply these changes.
Install from QGIS official plugin repository
The easiest way to install VPP is from the QGIS official plugin repository. First, open the Manage and Install Plugins Interface (See Figure 3).

Figure 3. Open QGIS Manage and Install Plugins Interface
Please type “vertical photo placer” in the search box if the VPP is not easily located (See Figure 4). Then, install the plugin. You should get a successful message on finish.
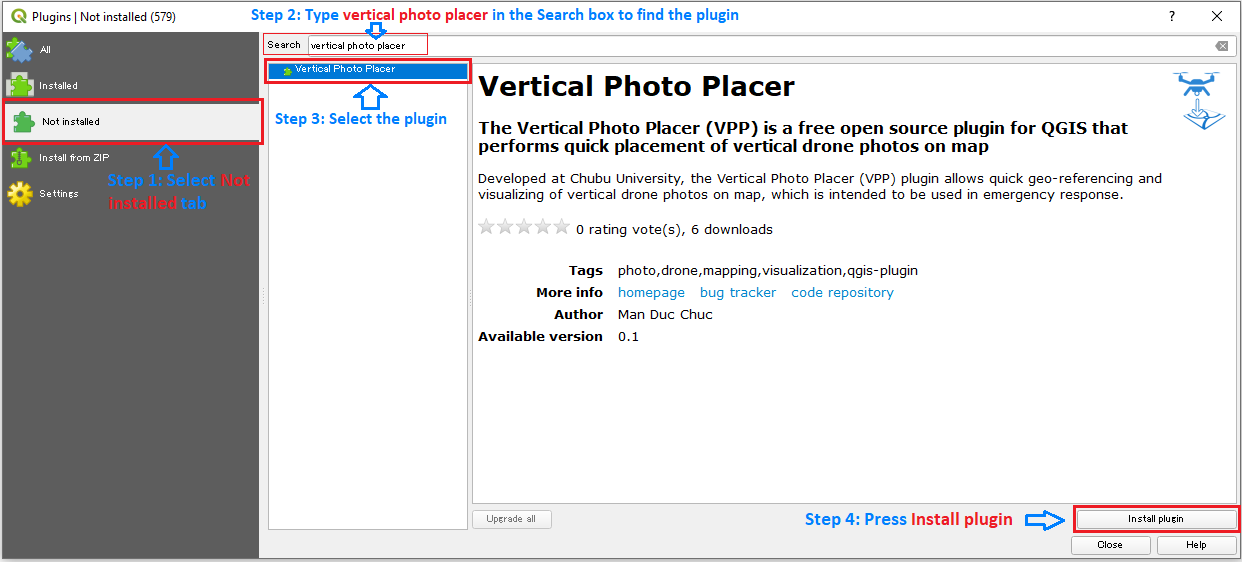
Figure 4. Search and install the VPP
Install from ZIP file
It is also possible in QGIS to install plugins from zip files. This feature is provided by the same QGIS Manage and Install Plugins Interface. This way, the source code of VPP should be compressed into a zip file. This file is made available at the official QGIS Python Plugins Repository, or at VPP Github. Please download it to your computer.
Then, in the QGIS Manage and Install Plugins Interface, select tab “Install from ZIP” and install VPP from the downloaded zip file (See Figure 5). QGIS may raise a warning as “Security warning: installing a plugin from an untrusted source can lead to data loss and/or leak. Continue?”. Press Yes to install. You should get a successful message on finish.
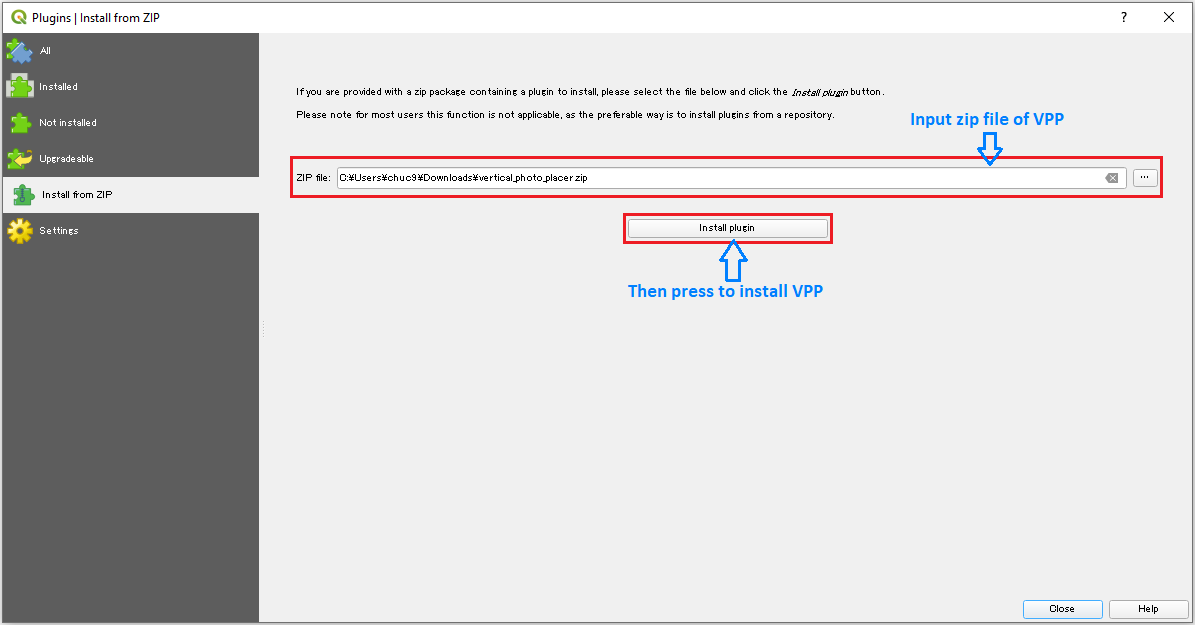
Figure 5. Install VPP plugin from zip file
Quick Start
VPP could be accessed either from the Menu Toolbar (Raster -> Vertical Photo Placer -> Vertical Photo Placer) or from the Plugins Toolbar (through app icon) (See Figure 6).
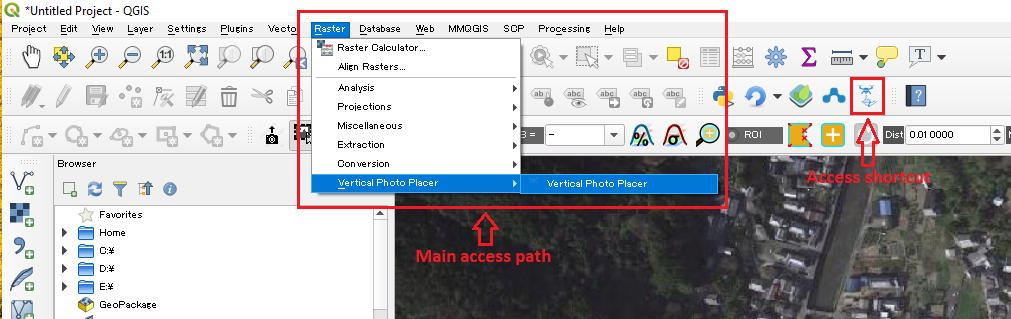
Figure 6. Open VPP
The default VPP user interface requires only one input to work, which is the full path of the photos folder (See figure 7). Users could either drag and drop/or browse to the input folder. In this mode, VPP performs Quick view to geo-referencing and visualizing all vertical drone photos found in the input folder. Geo-referencing uses default parameters as available in each photo’s metadata. This is done automatically.
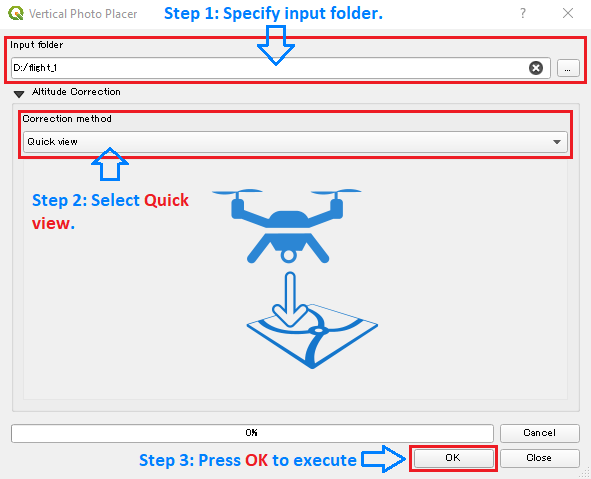
Figure 7. Guide to Quick view
It is recommended to use this feature first to quickly visualize photos. Quick view will often deliver good placement of vertical photos which were taken on flat terrain from a home point of similar terrain elevation.
If the visualization is unsatisfactory, several adjustment features are provided, as described in the following section.
Improving visualization of vertical drone photos
Visualization may be influenced by several factors which include photo’s ground altitude and GPS accuracy. GPS accuracy is often known and could be corrected in sophisticated software. This plugin focuses on estimation of the correct photo’s ground altitude, to enhance visualization.
Drone photos such as DJI Phantom 4 contain barometer altitude and GPS altitude. Barometer altitude is often more stable than GPS altitude, but it is measured against home point. This could significantly reduce visualization if the terrain elevation of the home point is greatly different from the photo’s terrain altitude. Therefore, it is desirable to estimate the home point’s terrain elevation which then could be used to estimate a photo’s ground altitude. Home point correction and Adjacent photo matching introduce two ways to estimate home point’s terrain elevation. It is noted that for these two features, the input folder should only contain photos of the same flight (i.e., share the same home point). If not, Flight Separator may be used to detect and separate flights.
Although GPS altitude is less stable than barometer altitude, it is still useful in cases where there is no barometer altitude, such as in some fixed-wing drones. But GPS altitude is still not the same as ground altitude yet. Simple correction implements a method to estimate ground altitude from GPS altitude.
Home point correction
This feature tries to estimate a photo’s ground altitude from the home point’s terrain altitude. It asks the user to locate the home point. Required inputs are photos input folder, a DEM file and location of the home point (See Figure 8). In the correction method, please select Home point correction. The DEM file could be SRTM (Shuttle Radar Topography Mission) or any applicable datasets (30 meter spatial resolution or less).
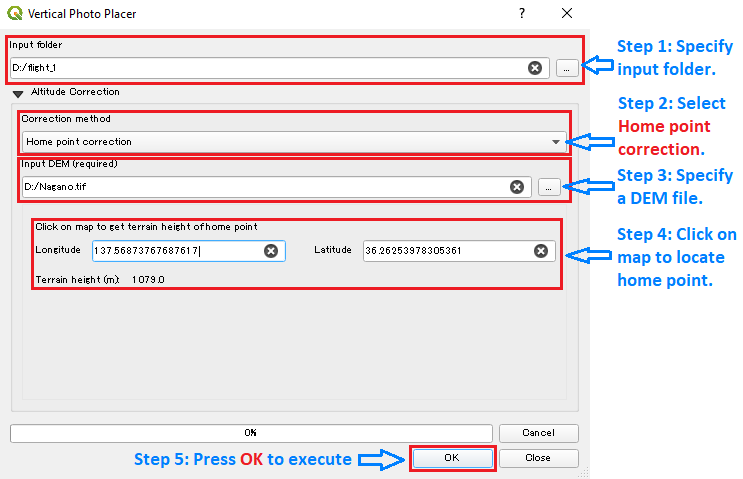
Figure 8. Guide to Home point correction
The basis of this feature is that a photo’s ground altitude (True ground altitude) could be estimated from its barometer altitude, terrain altitude and home point’s terrain altitude (See Figure 9).
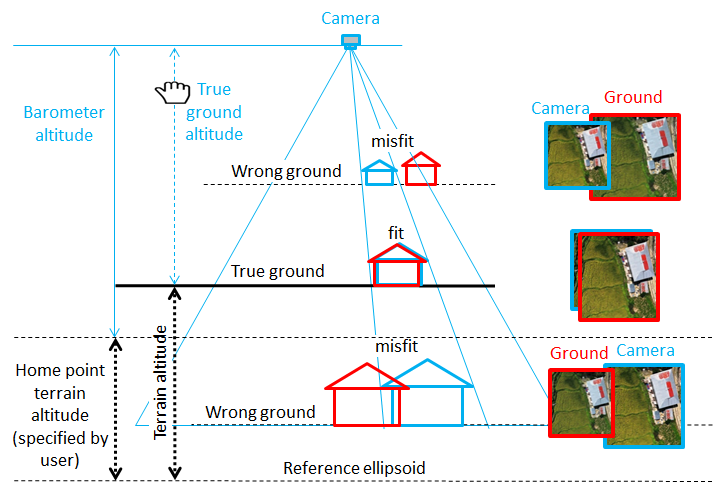
Figure 9. Background of estimation of photo's ground altitude from home point's terrain altitude
As the user is expected to provide location of the home point, it may be difficult in cases such as the user is not the person taking the photos, or just simply forgot the location. In such situations, Adjacent photo matching may be useful.
Adjacent photo matching
Similar to Home point correction, this feature also tries to estimate a photo’s ground altitude from home point’s terrain altitude. However, the way to estimate is different. Required inputs are photos input folder and sliding offset resulting from photos matching (See Figure 10). In the correction method, please select Adjacent photo matching. DEM is optional but recommended. The DEM file could be SRTM (Shuttle Radar Topography Mission) or any applicable datasets (30 meter spatial resolution or less).
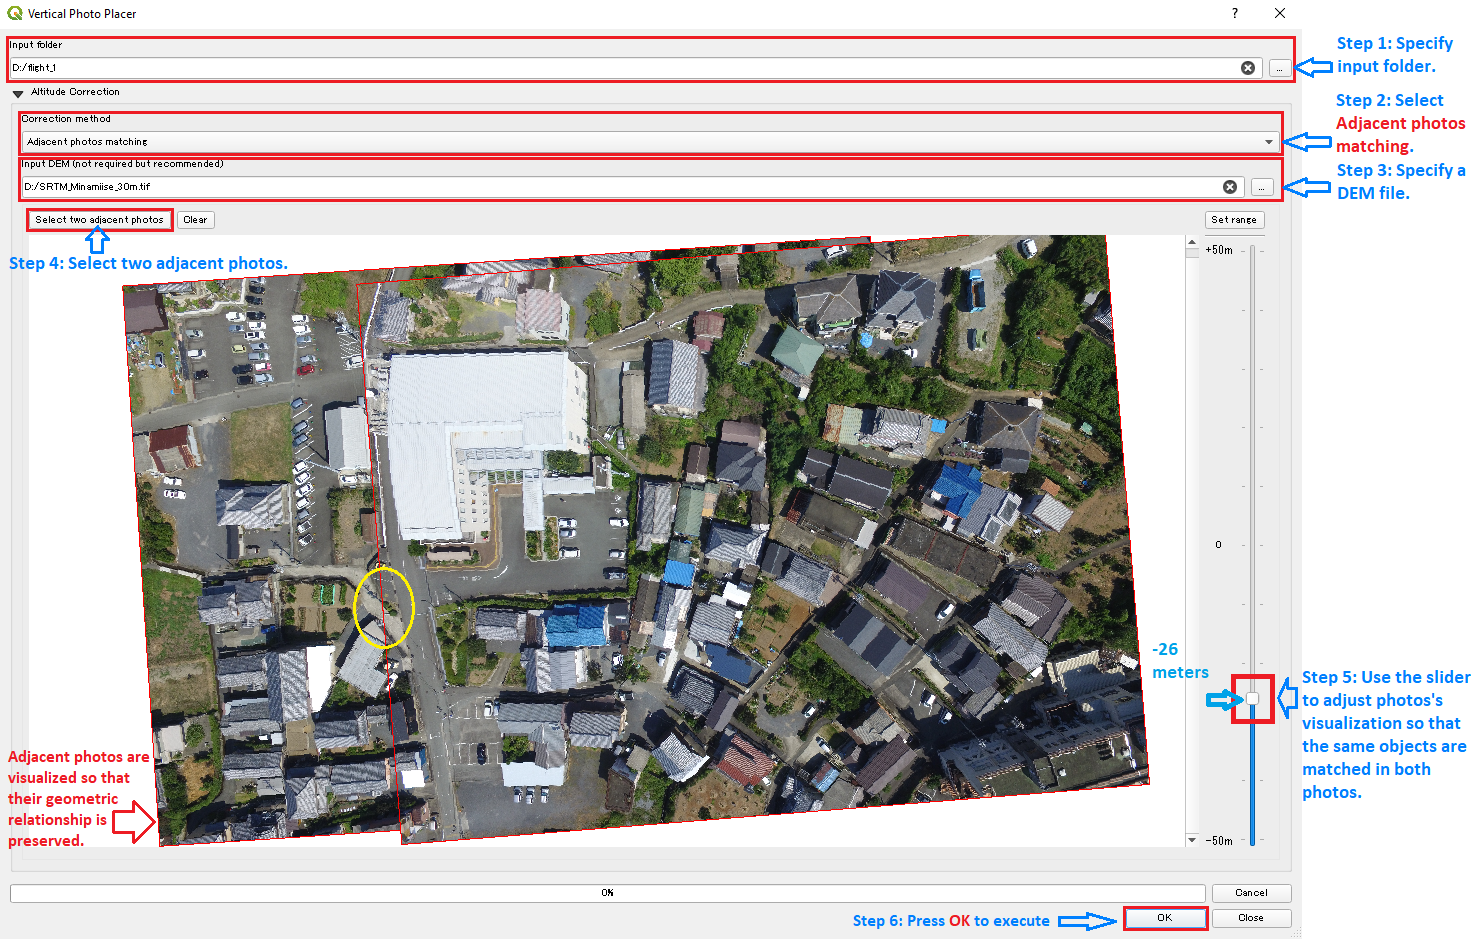
Figure 10. Guide to Adjacent photos matching (after sliding)
The basis of this feature is that the home point’s terrain altitude could be estimated from matching two adjacent photos (See Figure 12).
When first loaded, photo 1 and photo 2 are visualized in such a way that their geometric relationship is preserved. This process uses barometer altitude. However, barometer altitude is measured against the home point’s terrain altitude, these photos will not match each other if home point is at higher or lower elevation (See Figure 11). By changing these barometer altitudes so that the photos match (this gives the sliding offset, See Figure 10 and Figure 12), it is possible to estimate the home point’s terrain altitude. From that, the photo’s ground altitude can be estimated.
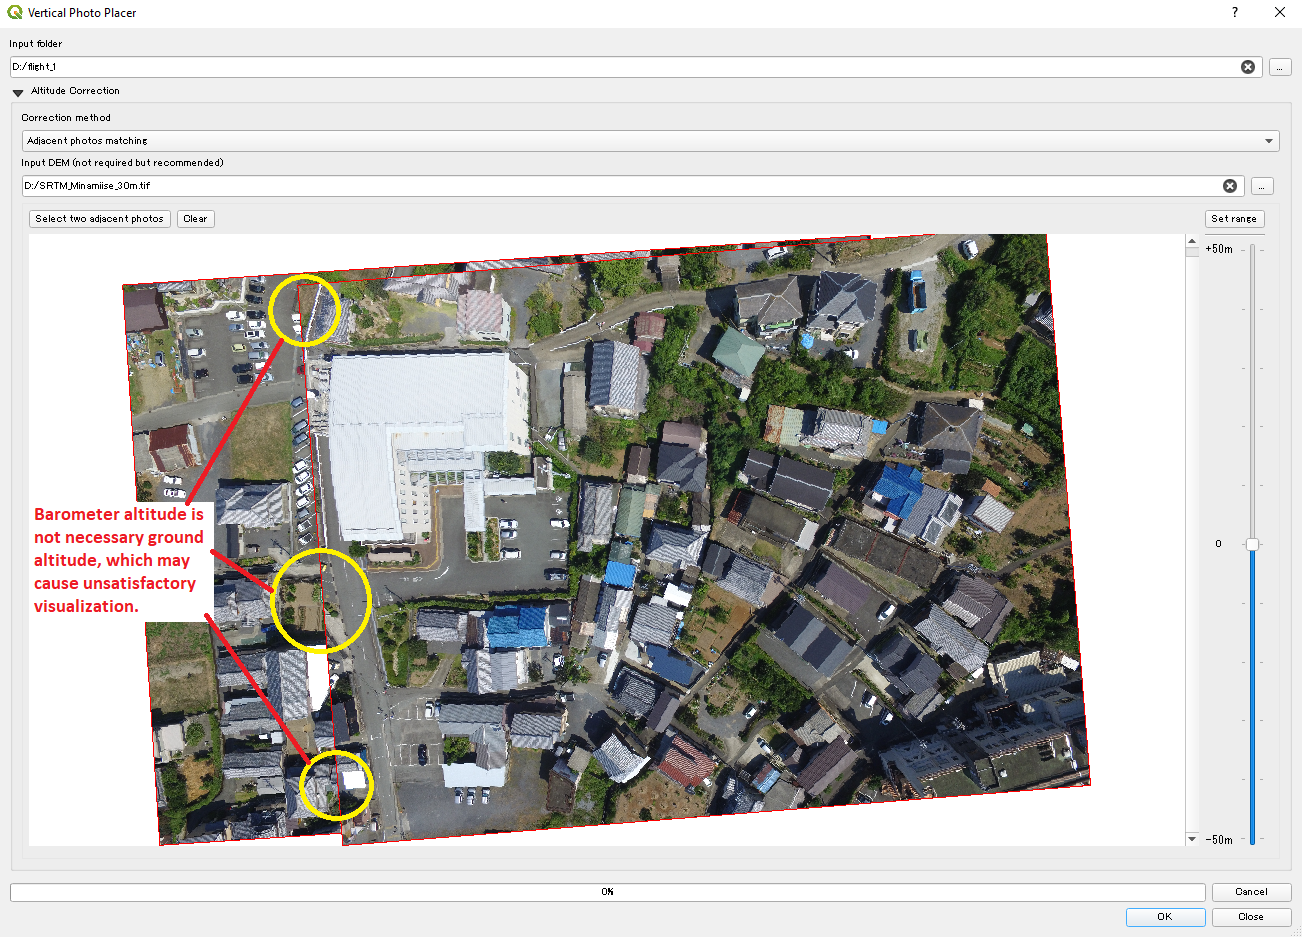
Figure 11. Guide to Adjacent photos matching (before sliding)
Subtraction sliding offset from the photo’s terrain altitude gives the home point’s terrain altitude.
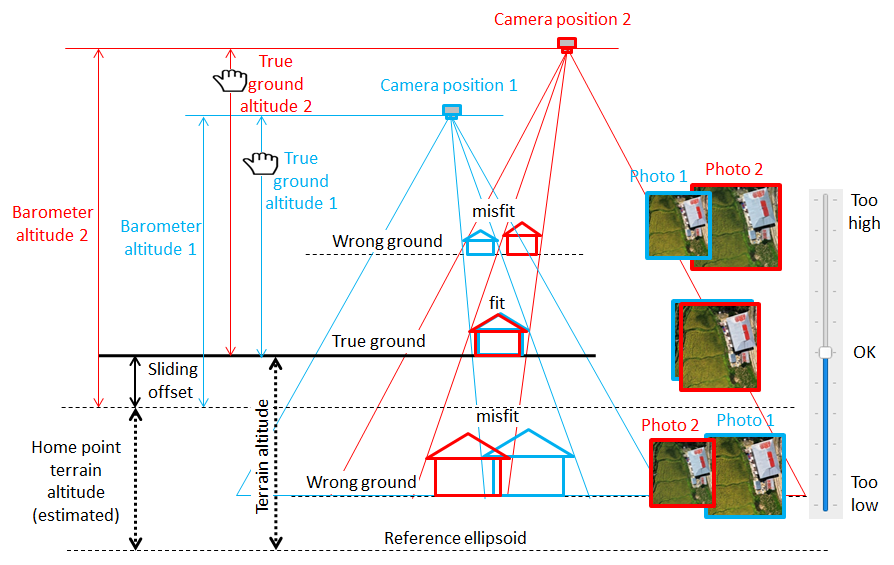
Figure 12. Background of estimation of photo's ground altitude by matching two adjacent photos
Simple correction
This feature tries to estimate a photo’s ground altitude from GPS altitude. Required inputs are photos input folder and a DEM file (See Figure 13). In the correction method, please select Simple correction. The DEM file could be SRTM (Shuttle Radar Topography Mission) or any applicable datasets (30 meter spatial resolution or less). This is similar to the previous barometer-based altitude correction.
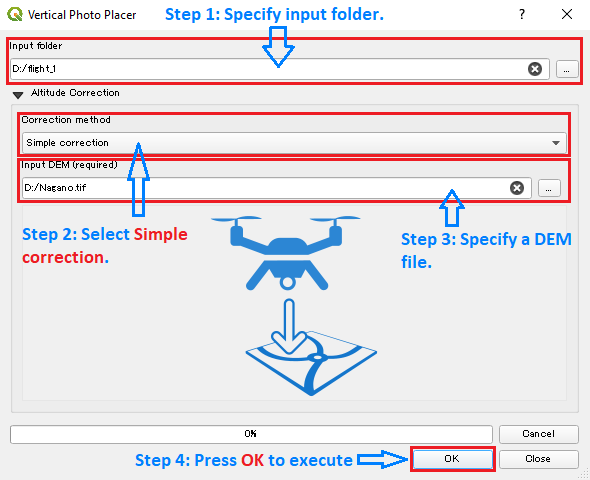
Figure 13. Guide to Simple correction
The basis of this feature is that the ground altitude is considered part of GPS altitude. The remaining part is terrain elevation. Therefore, ground altitude could be derived by subtracting terrain elevation from GPS altitude (See Figure 14).
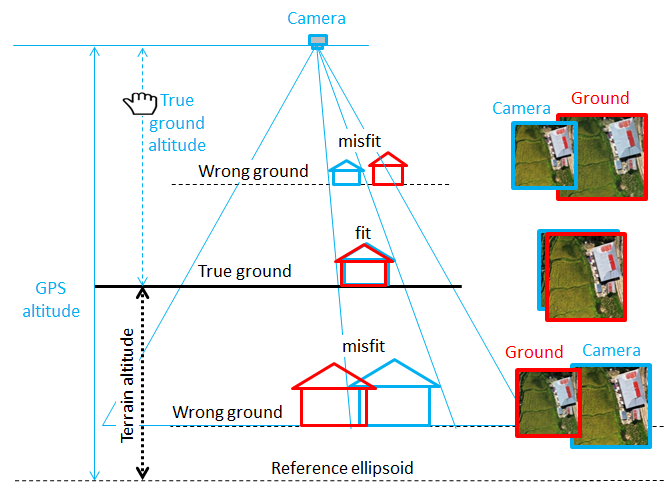
Figure 14. Background of estimation of photo's ground altitude by terrain subtraction
Because Simple correction uses GPS altitude which may often be less stable than Barometer altitude, this feature should be used in cases where:
- The photos do not have a Barometer altitude.
- It is difficult to remember the homepoint location.
- The GPS accuracy is so low that it is difficult to match adjacent photos.
FAQ
-
What kind of drone photos are supported?
VPP is developed to visualize vertical photos which is when gimbal pitch angle is perpendicular to the ground surface. However, oblique photos could be visualized also but it may not be easy to interpret.
-
What kind of cameras are supported?
VPP requires several metadata tags to perform geo-referencing of photos. These tags are often found in DJI drones photos. However, any photos that have enough information are also supported.
-
How to add support for more cameras?
Most of the required information is found in photo’s metadata. However, the camera sensor’s size is an additional required information. The camlist.xml file contains a list of sensors which provides VPP the information. If your photo’s sensor is not in this file, please add an entry for it (name, width, height). VPP will be able to support your camera then, after reloading the plugin or restarting QGIS.
It is highly appreciated if you could create a pull request or raise an issue to help VPP support more cameras in later versions.